| Book |
Page |
Context |
 |
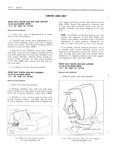 |
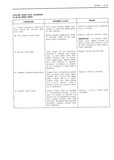
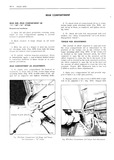
then remove screws 35 38 46 48 68000 SERIES 1H50 Repeat this operation on opposite side 37 39 AND 67 STYI ES of arm rest then carefully remove 11 111 rest as sembly including trim ...
csmzn ARM mast supponr 35 38 46 48 68000 SERIES 4 To insttill reverse removal procedure 37 39 AND 67 STYLES FRONT SEAT CENTER ARM REST ASSEMBLY ...
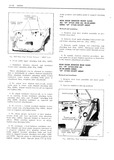
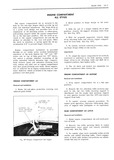
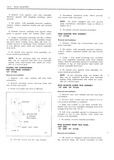
SERIES 37 39 AND 67 g Y Eg l Remove center arm rest assembly Rem v I rind Irrs lI i n 1 Place arm rest in up position 2 Working between ii H1 rest |
|
 |
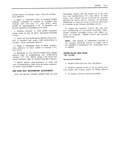
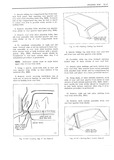
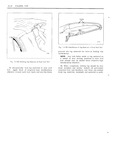
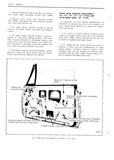
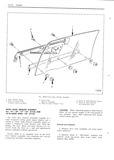
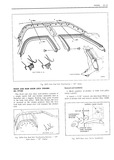
FASTENER5 W SECTION A A 1592 Fig ID2 Side Roof R i Wectherstrip 39 Styles v SIDE ROOF RAIL WEATHERSTRIP AND RETAINER NOTE Bead should be outboard of attaching ALL 39 STYLES AND 38000 screw ...
1D28 1 Remove plastic snap fasteners at front and or rear of weatherstrip Fig 1D2G for 39 styles 5 Apply a bead of black weatherstrip adhesive Fig 1027 for G9 styles to outboard flange |
|
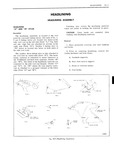 |
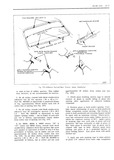
HEADLINING 5G l HEADLINING ASSEMBLY H5AD N NG Finishing lace covers the headlining material 37 AND 39 STYLES edges and assist in holding the material in place gemgpncn CAUTION Clean hands are essential when ...
side View D Number 5 listing wire on V i ile pro E We C vermb UVA 39 styles is located into holes on both sides of m mc S the side roof rails ...
Rear view mirror support cemented to the side roof rail ilanges Views C and D On 39 styles the rear quarter mate C Dome or courtesy lamps rial is attached to a pronged retainer |
|
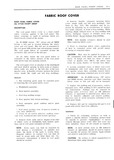 |
n1eldiin dielectrically joined at the seams NOTE New flexible retainers sheuld be used On 25 26000 Series 39 styles and all 68000 when replacing fabric cover Series a felt pad is located between the fabric ...
left drip moldings cever from remaining cemented area of reef panel Removal IMPORTANT On 25 26000 Series 39 styles and 68000 Series exercise care when removing l The following parts must be removed prior mbric |
|
 |
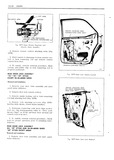
trim as FRONT DOOR VENTILATOR scmbly and detach inner pancl watcr deflector MANUAL AND ELECTRIC ALL 37 39 57 67 STYLES AND 2 Remove bolts securing door inner panel cam 38 48 68000 SERIES ...
roof rail weatherstrip as described below ALL STYLES Removal cnd Installation FRONT DOOR VENTILATOR ADJUSTMENTS ALL 37 39 57 67 STYLES AND l Raise door window Rcinovc door trim as 33 48 68000 SERIES |
|
 |
support attaching LOWER SASH bolt CPIAPIcP iLw CAPIAJ Q REAR DOOR WINDOW FRONT GUIDE FRONT GLHDE ALL 39 STYLES AND ALL 38 48 68000 UPPER BON SERIES 69 STYLES EXCEPT ...
channel and ventilator REAI 2 R WINDOW REAR GUIDE frame lower adjustin studs Fi lD68 AI I 39 STYLES AND AI I 38 48 68000 SERIES These attaehments can be adjusted in eonibina |
|
 |
windshield to side roof rail flanges back window side roof rail flanges and rear quarter areas On 39 styles disengage headlining at the 4 Lift headlining assembly into body rear quarter lower edge from ...
down in different holes as required to compensate for headlining which may be too NOTE On 39 Styles N0 5 listing wire is tight against the roof panel or too loose making installed i11t0 holes |
|
 |
dependent on the position of the regulator lift FRONT DOOR WINDOW arm GLASS RUN CHANNEL ALL 39 STYLES AND 38 48 68000 IMPORTANT DO NOT drill into the motor SIERIES 69 STYLES housing part |
|
 |
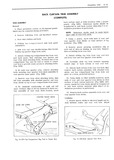
punch hole in top material for each trim stick attaching bolt 39 Install top material into body Make sure rear and rear quarter trim stick attaching bolts are j f Y completely driven |
|
 |
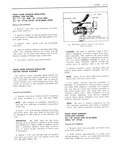
provided through an air intake grille located immediately Adjusvmenis rearward of the back window for 37 and 39 styles and on top of tulip panel for 6 7 styles l To adjust the engine compartment |
|
 |
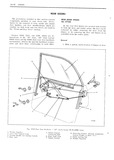
REAR END 5F l BACK WINDOW ASSEMBLY 37 AND 39 STYLES BACK WINDOW RETENTION 2 Spacer Part No 4871330 or equivalent 34 x 44 x 1 0 rectangle The back window is retained |
|
 |
Doons REAR DOORS 39 STYLES Figure 5D2l identifies the various rear door The pmcgdur s included in this Section com components and illustrates their relationship to cern rear door components only Procedures for Each |
|
 |
Beginning at rear end of weatherstrip engage CENTER PILLAR TRIM PANEL rnboard edge of weatherstrip into weatherstrip 39 STYLES retainer 3 Fig 5D1l Using a flat blade tool insert outboard edge of weatherstrip into retainer |
|
 |
fastener at rear of weatherstrip and remove SIDE ROOF RAIL WEATHERSTRIP Wmtherstl ip mm bOdy 37 AND 39 STYLES 4 If retainer is to be removed mark location of The Side |
|
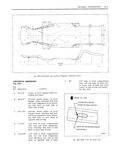 |
POINT ing bolt head or bolt hole on EDGE OF RAILMETAL l same side of body C 39 1 16 Directly below center of front bumper lower attaching bolt hole P and front suspension front |
|
 |
TRIM SUCK wsnniir mizxs ON vimi MArsmAi iNmcAnNG UDA mn or will sim Fig 2 I 39 Loe iing Edge of lop Material Fig 2 I 41 M i i i g Buck Corwin |
|
 |
VXLSFFZV s z 39 V Ye r V i Y FQ V rrr DRMN GUTTER Rice it wueemcuse Z r j TNNER PANEL rrr r I7l2 rr wu Fig 2 I 16 Baal Curtain installation |
|
 |
ILLLF C l RlCAL lL 39 LJ 77 7 if eie e W C Ti L L SIX WAY SEAT CONTROL SWITCH BLOCK |
|
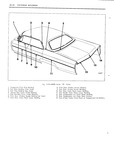 |
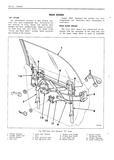
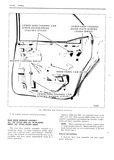
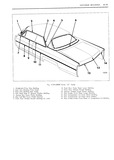
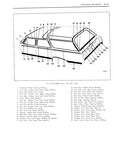
Series 39 Styles i wrrraslripla Pillar Drip tvipldipg 8 Front Door Window ripvepri Molding 2 Root Drip tvipirlrrrg Front Scalp 9 Rear Door wrpdpw Reveal Molding 3 Rool Drip Molding Rear Scalp l0 Rear Door |
|
 |
SWITCH FRONT AND REAR DOOR ARM RESTS MOUNTING BASE COVER ALL STYLES EXCEPT 38000 68000 SERIES 38437 39 AND 43437 3949 gryugg Izem v I cmd Ins I ion Removal ima Instulluiion l Remove screws |
|
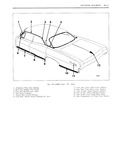 |
Series 39 Styles l Windshield Pillar Drip Molding 7 Front Door Outer Panel Lower Molding Z Root Drip Molding Front Scalp 8 Rear Dom Outer Panel Lower Molding 3 Root Drip Molding Rear Scalp |
|
 |
rrrr 7 a s V ii 0 ww t F ll p i l I Fig l 39 lnst ati n of lop Material to Front Roof Rail l Rl pierred into top material |
|
 |
exposed at rent efpecket Install rear end dt cable attaching bracket over l1o0l edpr r 39 Cut or punch hole in tup material fer each tion ef incl then pull cable tlircnigli pncket When trim |
|
 |
masking tape over each side of glass and roof 4 On 38000 48000 68000 Se1 ies 39 extension Slit tape vertically at edge of glass so 5 l styles and 68069 styles cement with black |
|
 |
Remove attaching screw securing front and i of Side tum pallet REAR QUARTER LOWER TRIM ASSEMBLY I 39 AND 69 STYLES 5 Raise trim panel and move 1t inboard Removal |
|
 |
prior to installing water g TE C9 LT RQL I deflector REAR DOOR LOCK ASSEMBLY lakh ALL 39 STYLES AND 38 48 68000 SERIES 69 STYLES EXCEPT 68069 I I4 Removal nd Installation 1 Remove |
|
 |
Arfechnient 5 To install reverse removal procedure Figures 1DGO and lDGl are exploded views oi the 39 and G9 style except 68069 style rear d00r window assemblies and identify the specific compe REAR DOOR WINDOW |
|
 |
pillar Fiu11r1 s lD54 lD55 and lD56 which are il lllSll L lllJ lS 1 1f the 39 style 69 style except 68069 style and the 68069 style rear clmnr luirdwure Rem v I meclizinisnis |
|
 |
DOORS 1D 39 VACUUM DOOR LOCK DIAGNOSIS 35 36 38 48000 SERIES L Lockts inoperative with front Door valve vacuum supply hose Check for pinched hose of affected door closed but operates with pinched |
|
 |
provided to relieve a MANUAL OR ELECTRIC binding door glass due to iiiisalignment of the glass ALL 39 STYLES AND 38 48 run channels The glass can also be adjusted to 68000 SERIES 69 STYLES |
|
 |
position and remove FRONT DOOR WINDOW ADJUSTMENTS rear guide plate attaching screws Fig 1D4 ALL 37 39 57 67 STYLES AND 38 48 68000 SERIES 69 STYLES 4 Remove inner panel cam attaclung screws |
|
 |
Anaciiang Bolt me FRONT DOOR WINDOW ASSEMBLY CAUTION When installing glass to sash channel ALL 37 39 57 67 STYLES AND bolts do not exceed torque of 50 inch pounds 4 38 48 68000 SERIES |
|
 |
EXTERIOR MOLDINGS 1K 39 |
|
 |
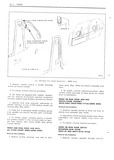
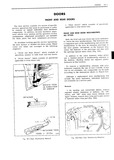
WASHER xenon AVA ASSEMBLY tw Fig 1 28 aae Roof ml vweqtnmmap Reminer w style shown 39 Similar mg lD29 D00r tact snztet nnsteuuetzm |
|
 |
ARROW l On hardtop and convertible styles remove exposed plastic fasteners at beltline On 39 styles and 69 style rear doors without door RETAI N ER upper frames remove door trim pad to gain access |
|
 |
rrrr V rr 7 39 I7 18 19 V T l l 9 20 21 28 22 23 V 27 24 25 26 1603 Fig 2l l2 33000 Series 55 65 Styles 1 Windshield Pillar |
|
 |
39 1 1 2 1 3 s 7 111 l 1 1 21 Fig 1F4 Rem Compurtntent Lid Hinge and Torqoe Rod Adiostment Styles Fig 4F5 Re r Compartment Lid Torque Rod Adjustments |
|
 |
39 |
|
 |
rnLM stick sous 48 Fig 5 I 39 Top Compartment Bog Tied to Center Bow Fig 5 I 40 Reur Quarter Trim Stick |