Jeep Parts Wiki | Ford Parts Wiki
Home | Search | Browse
|
Corvair Chassis Shop Manual December 1964 |
|
Prev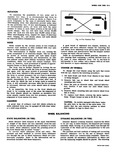
 Next
Next
3819551
3819551
information however will help in the correction o dynamic balance i NOTE Before attempting to balance the wheels check to be certain that no foreign matter has been trapped in the wheel ventilation slots or in the accessory wheel discs This is especially important if the vehicle has been run in soft mud and then parked in freezing weather When a wheel that is statically unbalanced is dynamically in balance the dynamic balance can be retain while correcting the static balance by installing the corrective weights so that half of the weight require is placed on the inner edge of the rim and the other halt on the outer edge of the rim Dynamic unbalance can be corrected without destroying static balance by installing weights so half of weigh l SERVICE P TIRES Removal Dismounting tubeless tires presents no problems if the correct procedures are used and the following precau tions observed 1 Remove the valve cap and valve core Let out all the air 2 Press the inner side of the tire into the rim well Use bead loosening tool or if regular tire irons ar used take particular care not to injure or tear well sealing ribs on the bead CAUTION Never use tire irons with sharp edges or corners 3 Using tire irons on the opposite side remove beadl taking small bites around the rim 4 Turn the tire over and use two tire irons one be tween the rim flange and the bead to pry the rim upward the other iron to pry outward between th bead seat and the bead Installation I The general procedure is the same as for tube and tire installation except that extreme care must be ex ercised to prevent injury to the sealing bead and cir cumferential bead when forcing tire over rim 1 Apply a light film of Ruglyde or other suitable rubber lubricant to sealing bead of tire NOTE The use of excessive lubrication may lead to rim slippage and subsequent breaking of oil seal 2 Carefully mount the outer bead in usual manner by using tire irons taking small bites around rim being careful not to injure the tire bead CAUTION DO NOT use a hammer as damage to the bead will result 3 Install the inner bead in the same manner i required for dynamic balance is placed on the rim opposite the heavy point while the other half is placed 180 away anA on the opposite side of the rim RUN OUT W O TIRE The wheels should not run out wobble more than 1 16 as measured on the side of the rim at the base of the tire Excessive run out is the result of a bent wheel an improperly mounted wheel worn knuckle bearings or steering connections These parts should be checked for correct adjustment proper alignment and wear whenever excessive run out is encountered The Wheels should also run concentric with the steering knuckle spindle within 1 i6 inch as measured on the tire bead seat of the rim with the tire removed Wheel run out eccentricity and balance are closely associated with steering and front wheel alignment Further information on these subjects will be found under Suspension ERATIIONS NOTE If a seal cannot be effected in the foregoing manner with the rush of air at can be accomplished by applying to the circumference of the tire a tire mounting band or heavy sash cord and tightening with the use of a tire iron On tire mounting machines bouncing the tire assembly is not required The tire should be lifted on the rim to force the top tire bead against the top rim flange The weight of the tire will seat the bottom bead Installation of Tires and Tubes on Wire Wheels For service repair it is recommended that the following procedure be used 1 ObtXin a new top quality tube never re use a tube when remounting a tire 2 Inspect flap if it is cut from demounting or previous mounting or if it shows signs of folds it should be replaced with U S Rubber 13 6DC flap or equivalent Production 3819551 v i Fig 7 Cleaning Hole with Awl CORVAIQ SN0V M NIl 1